REVIEW · AMSTERDAM
Amsterdam Night Photography Workshop with a Professional
Book on Viator →Operated by Isee Amsterdam Photography Tours · Bookable on Viator
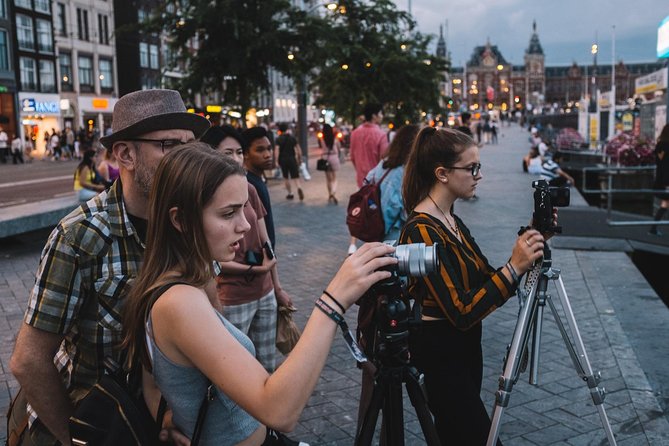
Night photography is where street scenes turn magical. In Amsterdam, you get the fun of shooting after dark while a pro helps you make the right choices, not just chase pretty lights. With Isee Amsterdam Photography Tours, the workshop is built for real results in a small group (max 5), led by photographer David, and it focuses on both where to stand and what to set on your camera.
I love that it’s teaching-first: you get composition guidance, plus hands-on feedback like setting suggestions and patient coaching through night basics. You’ll also be able to join without owning everything, since you can bring or borrow equipment (including a tripod). The main thing to consider is that it depends on workable night weather and light, so if conditions are poor, your date may shift.
In This Review
- Quick Hits: What Makes This Workshop Worth Your Time
- Why Shoot Amsterdam After Dark (And Why This Workshop Helps)
- Meet-At-Stationsplein: The Logistics That Affect Your Photos
- How the Workshop Works: A 90-Minute Plan That Stays Practical
- Red Light District at Night: Where Your Shots Get Interesting Fast
- The Night Photography Skills You’ll Actually Use
- Equipment Reality: Bring Your Gear or Use What’s Provided
- Meeting David and Getting Feedback That Moves You Forward
- Price and Value: What $114.39 Buys You in Amsterdam
- Weather and Timing: The Two Things That Can Change Your Night
- Who Should Book This Workshop (And Who Might Skip It)
- Final Call: Should You Book This Amsterdam Night Workshop?
- FAQ
- FAQ
- How long is the Amsterdam night photography workshop?
- When does the workshop start?
- Where do we meet for the workshop?
- What part of Amsterdam is included?
- What is the group size limit?
- Do I need my own camera and tripod?
- What happens if the weather is bad?
- Is free cancellation available?
Quick Hits: What Makes This Workshop Worth Your Time
- Small group, real help: max 5 people means you’re not just watching from the side.
- One focused night mission: you build a strong set of shots during one concentrated session in Amsterdam at night.
- Tripod support: reviews mention David provided a tripod, which helps long exposures.
- Practical night settings coaching: you get concrete advice for getting good exposures, not vague tips.
- Composition and depth talks: you’ll get help thinking about framing, depth, and how to control what’s sharp.
- Beginners to serious shooters: the teaching is designed to work across skill levels.
Why Shoot Amsterdam After Dark (And Why This Workshop Helps)
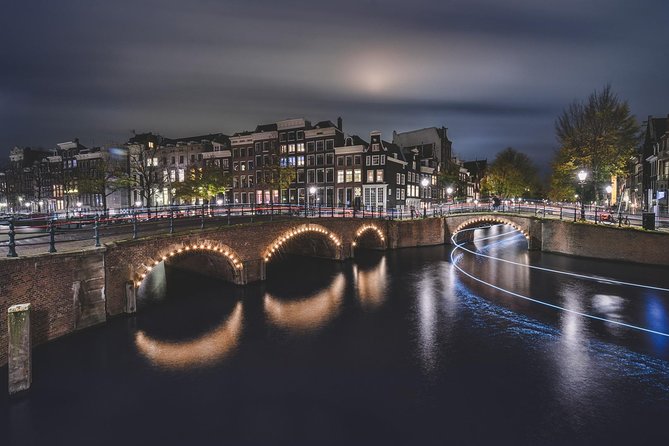
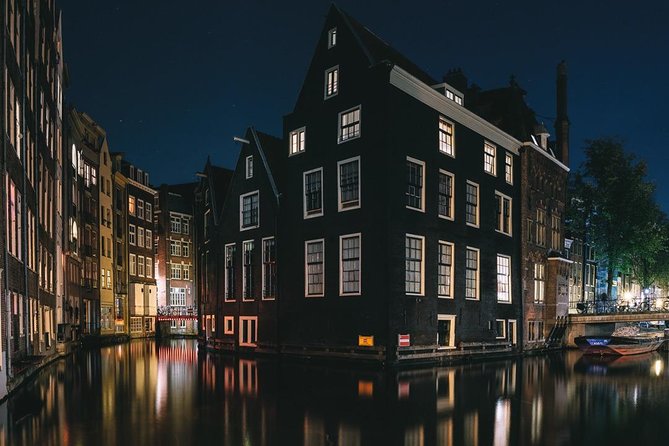
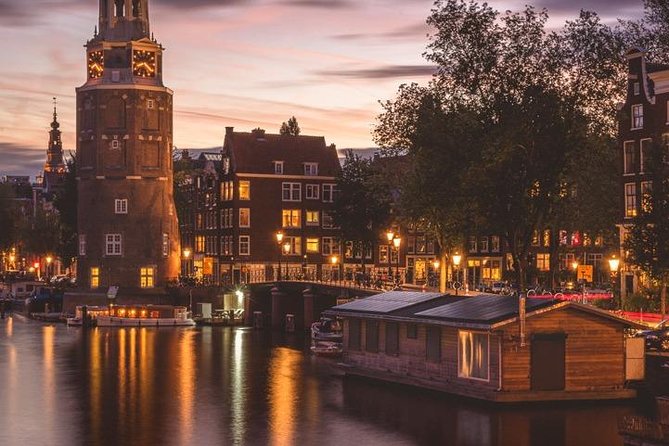
Amsterdam at night has a different personality than daytime. Streets feel calmer, reflections show up, and light sources create contrast you can actually shape with your camera choices. The hard part is that night shooting is less forgiving, so the difference between a great photo and a frustrating one is often settings plus placement.
This workshop earns its keep because it treats night photography like a skill you can practice quickly. Instead of telling you to try random settings until something works, you learn what to do with your camera and why that choice matters for your scene. You also get a guide who knows where the best photo angles tend to come from, which saves time.
You can also read our reviews of more evening experiences in Amsterdam

Meet-At-Stationsplein: The Logistics That Affect Your Photos
The session runs about 1 hour 30 minutes, starting at 9:30 pm. You meet at Stationsplein, 1012 AB Amsterdam, and it ends back at the same meeting point. That timing matters because at night you’re fighting two clocks: the city’s light changes, and your own setup time.
In reviews, people mention finding David easily near Amsterdam Centraal, which is reassuring when you’re trying to get gear ready in the dark. Aim to arrive a little early so you’re not rushing to assemble a tripod or change lens settings once the workshop really starts.
Also note the group size: this is capped at 5 travelers. That’s big enough to feel social, but small enough for the instructor to notice what’s going wrong with your focus, exposure, or framing.
How the Workshop Works: A 90-Minute Plan That Stays Practical
This kind of workshop can go two ways: either it’s a fun walk with photo talk, or it’s a guided shoot that helps you produce usable images. The way this one is set up leans hard toward the second option: you start in a specific area and you get direction for how to capture it.
You’re not just given a list of locations. You’re taught techniques for night photography, and you’re shown how to execute them. That includes practical discussions that help you understand what you’re seeing in your viewfinder or on your screen and how to translate it into settings.
And because the instructor has a long professional background in photography industry work and teaching, the feedback stays hands-on. Reviews highlight that the coaching is patient and flexible, especially when people are still learning manual shooting basics or working out exposure issues.
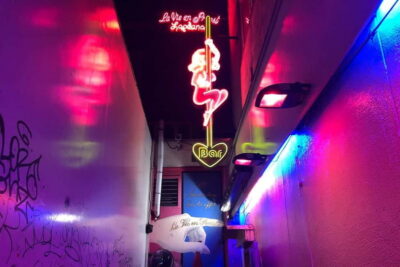
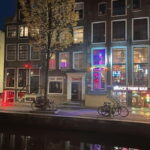
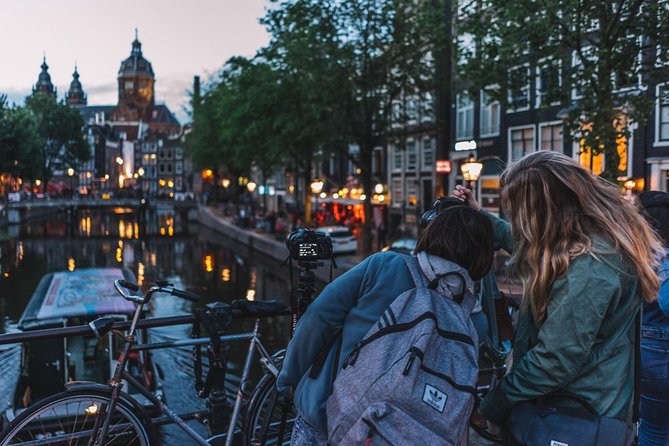
Red Light District at Night: Where Your Shots Get Interesting Fast
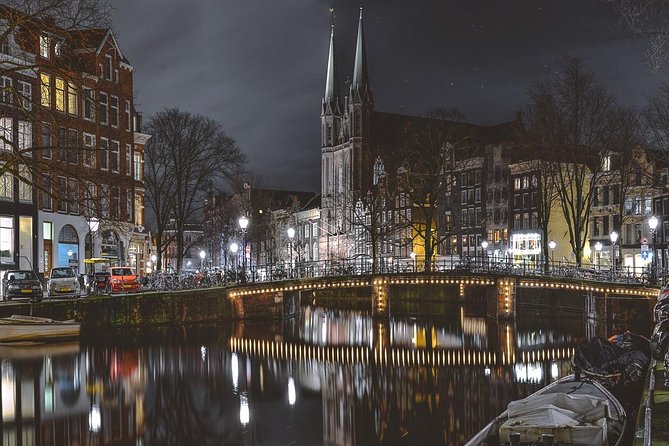
The itinerary is straightforward: the main stop is the Red Light District. That doesn’t mean it’s only one type of photo. What it does mean is you’ll be shooting in a part of Amsterdam where the nighttime look is strong and the scene has plenty to work with: lights, contrast, and street-level angles that reward careful composition.
The value here is that a guide like David helps you turn that visual complexity into clear frames. Reviews specifically call out composition tips, and that’s the real trick in night photography—deciding what the viewer should look at first. If you nail that, the light becomes an asset instead of clutter.
A possible consideration: this is an area that can feel busy, and it’s also sensitive as a neighborhood. Keep the vibe respectful, stay aware of your surroundings, and treat people as people, not part of the background. You’ll get better photos and you’ll enjoy the walk more.
The Night Photography Skills You’ll Actually Use

Night photography often sounds technical, but this workshop keeps it grounded. Over about 90 minutes, you’ll work on the parts that most commonly block people from getting sharp, well-exposed results.
Here’s what you can expect the coaching to focus on:
- Exposure choices for night scenes: you’ll get setting suggestions aimed at producing usable light rather than guesswork.
- Composition that controls the frame: reviews mention composition and framing help, which matters a lot when street lighting is all around you.
- Depth and what to keep sharp: multiple reviews mention discussions about depth, which helps you decide what should be crisp and what can soften.
- Manual shooting basics: one review explicitly notes learning manual shooting basics and how to apply them in practice.
- Using a tripod for long exposures: tripod support shows up in reviews, and it’s a practical advantage if you’re learning long exposure techniques.
If you’re new, the workshop gives you a workflow you can repeat later. If you’re already shooting manually, the benefit is feedback targeted at your framing and settings. Either way, you end up with more than just a walk—you get a set of skills you can bring to future nights in Amsterdam.
You can also read our reviews of more photography tours in Amsterdam


Equipment Reality: Bring Your Gear or Use What’s Provided
The workshop is designed so you don’t have to own everything. It’s set up so you can bring or borrow equipment, and reviews mention that David provided a tripod. For night shooting, that matters because long exposures and stability are linked.
Here’s how to think about it as a value decision. If you already own a camera and tripod, you’ll learn faster because you can test changes immediately. If you don’t have the right gear, borrowing helps you avoid spending money right before a trip, and it prevents you from missing the core technique of long exposure work.
If you’re traveling light, this is one of those situations where the workshop setup reduces friction. You’ll spend more time shooting and getting corrected, less time stuck figuring out what you brought and what you’re missing.
Meeting David and Getting Feedback That Moves You Forward
A big part of why this workshop earns strong ratings is the way instruction happens. Reviews paint David as friendly, patient, and flexible, with a real knack for helping people who are at different levels. One review mentions he helped make it easy to find him at Amsterdam Centraal Station, and that small detail is more important than it sounds when you’re arriving to a nighttime meeting point.
You’ll also get feedback that’s specific, not generic. Reviews mention suggestions for best results, setting help, and composition tips. That kind of targeted coaching helps you correct the most common mistakes quickly, like a photo that’s too dark, too blurry, or poorly framed for what the scene is actually offering.
One note of realism: night workshops move faster than daytime tours. So if you tend to get overwhelmed by lots of camera terms, focus on the immediate adjustments your guide suggests and test small changes one at a time.
Price and Value: What $114.39 Buys You in Amsterdam
At $114.39 per person for about 1 hour 30 minutes, the cost isn’t just paying for someone to walk you somewhere. You’re paying for (1) access to a professional photographer, (2) personalized feedback in a very small group, and (3) the chance to shoot with equipment support like a tripod.
That’s how this becomes good value. A guided night photo lesson helps you avoid wasting your best shooting hours fumbling through settings on your own. Even one session where you learn what to change for better exposure and composition can improve every photo you take afterward.
And because the workshop is max 5 people, you’re less likely to feel like you’re sharing one instructor’s attention with a crowd. That personalized service is the main reason many small photo workshops justify their price.
Weather and Timing: The Two Things That Can Change Your Night
This experience requires good weather. Night photography depends on conditions, and if weather is poor, the workshop may be canceled and you’d be offered a different date or a full refund. That’s not a small detail; it’s one of the biggest practical reasons to book with a bit of flexibility in your schedule.
Timing also matters. Starting at 9:30 pm means you’re working at a point when the city is already in full night mode, so your window for shooting is shorter. If you’re hoping to catch a specific look, plan to arrive early and be ready to start without delays.
Who Should Book This Workshop (And Who Might Skip It)
This is a good match if you want to do more than take casual night photos. If you’re trying to learn night basics, improve your manual shooting, or get comfortable with composition and depth, you’ll likely feel the benefits quickly.
It also suits experienced photographers who want targeted feedback. Reviews highlight discussions about equipment and deeper technique topics, so it’s not only for beginners.
You might skip it if you already know night settings inside and out and prefer independent exploration. You could still enjoy it, but you may feel the value is less obvious since the workshop’s edge is guided technique plus a pro’s location knowledge.
Final Call: Should You Book This Amsterdam Night Workshop?
Yes, I’d book it if you want guided night photography that’s focused, friendly, and built around real teaching. The strongest reasons are the small group size, David’s patient coaching, and the combination of composition tips plus practical night setting guidance. If you’re ready to learn fast and trade some walking time for better photos, this is a smart use of an evening.
The only real caution is weather and timing. If you can handle a possible reschedule and you’re willing to show up on time with gear (or borrow what’s available), you’ll get a fun, productive night shoot with the kind of feedback that actually changes results.
FAQ
FAQ
How long is the Amsterdam night photography workshop?
It lasts about 1 hour 30 minutes.
When does the workshop start?
The start time is 9:30 pm.
Where do we meet for the workshop?
You meet at Stationsplein, 1012 AB Amsterdam, Netherlands.
What part of Amsterdam is included?
The workshop includes a stop in the Red Light District.
What is the group size limit?
The experience has a maximum of 5 travelers.
Do I need my own camera and tripod?
You can bring your equipment or borrow equipment so you can take part.
What happens if the weather is bad?
The experience requires good weather. If it’s canceled due to poor weather, you’ll be offered a different date or a full refund.
Is free cancellation available?
Yes. You can cancel up to 24 hours in advance for a full refund.